


今回は前回記事で紹介したのヒートマップ風のタグクラウドに、他の色を付けると、どのような表示になるかという内容です。
今回は、前回と色違いの単色表示を紹介します。色設定は、ショートコードで行います。
好みの色にする場合は、色番号を変更するだけになります。
前回の記事のヒートマップ風のタグクラウドの表示に成功したら、好みの色のヒートマップ風のタグクラウドを遊ぶ気持ちで挑戦してみてください!
前回記事

これらのコードは、AIで作成したもので、環境によっては機能しないかもしれません。そのため、コードを追加する場合は注意してください。
念のためにバックアップを推奨します。
ヒートマップ風タグクラウドの単色表示方法
functions.php用とCSS用のコードが必要になります。そして、色設定のショートコードがあります。
functions.php用:汎用カラー対応コード
以下が「functions.php用:汎用カラー対応コード」になります。テーマファイルエディターの子テーマ(swell child)の中の functions.php の空いたところにペーストしてください。
// 任意カラー対応ヒートマップ風タグクラウド
function custom_tag_cloud_boxed_color_shortcode($atts) {
    $atts = shortcode_atts( array(
        'number' => 10,
        'color'  => '#ff0000', // デフォルト:赤
    ), $atts, 'custom_tag_cloud_boxed_color' );

    $base_color = sanitize_hex_color($atts['color']);
    if ( ! $base_color ) {
        $base_color = '#ff0000';
    }

    // HEX → RGB
    list($r, $g, $b) = sscanf($base_color, "#%02x%02x%02x");

    $tags = get_tags( array(
        'orderby'    => 'count',
        'order'      => 'DESC',
        'number'     => $atts['number'],
        'hide_empty' => true,
    ) );

    if ( empty( $tags ) ) return '';

    $html = '<div class="custom-tag-boxed-heatmap-color">';

    foreach ( $tags as $i => $tag ) {
        $rank = $i + 1;
        if ( $rank > 9 ) break;

        // 濃淡(1位=最も濃い)
        // opacity: 1.0 → 0.25
        $opacity = 1 - (($rank - 1) / 8) * 0.75;
        $bg_color = "rgba({$r}, {$g}, {$b}, " . round($opacity, 2) . ")";

        // フォントサイズ
        if ($rank === 1) {
            $font_size = 48;
        } elseif ($rank === 2) {
            $font_size = 26;
        } else {
            $font_size = 24 - (($rank - 3) / 6) * 16;
        }

        $html .= '<a href="' . esc_url(get_tag_link($tag->term_id)) . '"
            class="tag-box-color tag-' . $rank . '"
            style="
                background-color: ' . esc_attr($bg_color) . ';
                font-size: ' . esc_attr(round($font_size, 2)) . 'px;
            "
            title="' . esc_attr($tag->count) . ' 件の投稿">
            <span>' . esc_html($tag->name) . '</span>
        </a>';
    }

    $html .= '</div>';
    return $html;
}
add_shortcode('custom_tag_cloud_boxed_color', 'custom_tag_cloud_boxed_color_shortcode');
汎用カラー対応ショートコード
CSS用:任意カラー対応ヒートマップ版コード
以下が「追加CSS用:任意カラー対応ヒートマップ版コード」になります。以下のコードをカスタマイズの追加CSSの空いたところにペーストしてください。
/* ================================
   任意カラー対応ヒートマップ
================================ */

/* 外枠:レスポンシブ(最大840px) */
.custom-tag-boxed-heatmap-color{
  position: relative;
  width: 100%;
  max-width: 840px;
  aspect-ratio: 2 / 1;  /* 840:420 */
  height: auto;
  box-sizing: border-box;
  overflow: hidden;
  background: #f7f7f7;
}

/* タグ共通 */
.custom-tag-boxed-heatmap-color .tag-box-color{
  position: absolute;
  display: flex;
  align-items: center;
  justify-content: center;

  color: #fff;
  font-weight: bold;
  text-decoration: none;
  overflow: hidden;
  border-radius: 6px;
  padding: 0 6px;
  box-sizing: border-box;
  white-space: nowrap;
  text-overflow: ellipsis;

  transition: transform 0.2s, box-shadow 0.2s;
}

.custom-tag-boxed-heatmap-color .tag-box-color:hover{
  transform: scale(1.05);
  box-shadow: 0 2px 6px rgba(0,0,0,0.3);
}

.custom-tag-boxed-heatmap-color .tag-box-color span{
  max-width: 100%;
  overflow: hidden;
  text-overflow: ellipsis;
  white-space: nowrap;
}

/* =================================
   配置(840×420ベース)を%に変換
   ※これで画面幅に合わせて自然に縮む
================================= */

/* 1位:420×420 -> 幅50% 高さ100% */
.custom-tag-boxed-heatmap-color .tag-1 { left:0%;    top:0%;    width:50%;    height:100%; }
/* 2位:420×210 -> 幅50% 高さ50% */
.custom-tag-boxed-heatmap-color .tag-2 { left:50%;   top:0%;    width:50%;    height:50%; }
/* 3位:210×210 -> 幅25% 高さ50% */
.custom-tag-boxed-heatmap-color .tag-3 { left:50%;   top:50%;   width:25%;    height:50%; }
/* 4位:210×105 -> 幅25% 高さ25% */
.custom-tag-boxed-heatmap-color .tag-4 { left:75%;   top:50%;   width:25%;    height:25%; }
/* 5位:105×105 -> 幅12.5% 高さ25% */
.custom-tag-boxed-heatmap-color .tag-5 { left:75%;   top:75%;   width:12.5%;  height:25%; }
/* 6位:105×52.5 -> 幅12.5% 高さ12.5% */
.custom-tag-boxed-heatmap-color .tag-6 { left:87.5%; top:75%;   width:12.5%;  height:12.5%; }
/* 7位:52.5×52.5 -> 幅6.25% 高さ12.5% */
.custom-tag-boxed-heatmap-color .tag-7 { left:87.5%; top:87.5%; width:6.25%;  height:12.5%; }
/* 8位:52.5×26.25 -> 幅6.25% 高さ6.25% */
.custom-tag-boxed-heatmap-color .tag-8 { left:93.75%;top:87.5%; width:6.25%;  height:6.25%; }
/* 9位:52.5×26.25 -> 幅6.25% 高さ6.25% */
.custom-tag-boxed-heatmap-color .tag-9 { left:93.75%;top:93.75%;width:6.25%;  height:6.25%; }

/* ページ全体の横スクロール抑止(必要なら残す) */
.entry-content,
.l-content,
.post_content{
  overflow-x: hidden;
}

/* ==========================================
   ヒートマップ:スマホ・タブレット文字サイズ調整
========================================== */

@media screen and (max-width: 767px) {

  /* 基準を統一する */
  .custom-tag-boxed-heatmap-color {
    font-size: 16px;
  }

  /* 全体縮小 */
  .custom-tag-boxed-heatmap-color .tag-box-color {
    font-size: 60% !important;
  }

  /* 1位だけ倍率を上げる */
  .custom-tag-boxed-heatmap-color .tag-1 {
    font-size: 150% !important;
  }

  .custom-tag-boxed-heatmap-color .tag-1 span {
    font-size: inherit !important;
  }

  /* 2位 */
  .custom-tag-boxed-heatmap-color .tag-2 {
    font-size: 80% !important;
  }

  .custom-tag-boxed-heatmap-color .tag-2 span {
    font-size: inherit !important;
  }

}
赤ヒートマップ版コード
設定
色を変える場所は「ショートコードのHEXカラーコード」の部分だけです。
PHPやCSSを編集する必要はありません。
設定方法は下記になります。
設定方法|色を変える場所(ここだけ)
記事やウィジェットに以下のショートコードを設定(ペースト)すると色が指定されます。
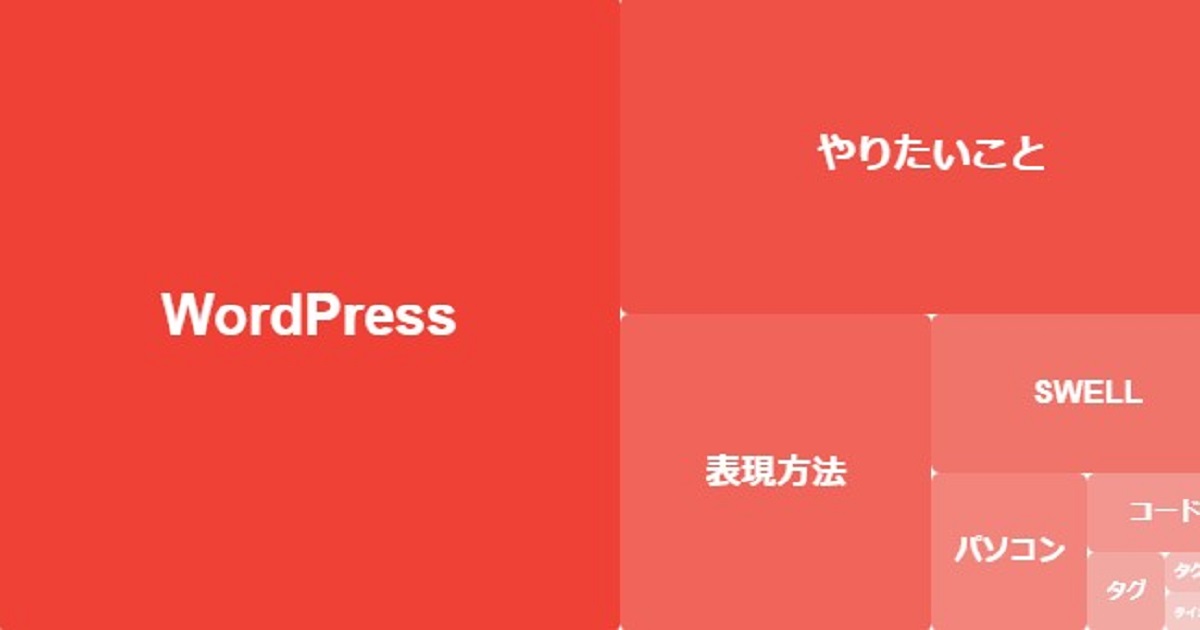
赤
この場合は、PHP側で設定している デフォルト色の赤を使います。
ここで指定されています。
'color' => '#ff0000', // ← ここがデフォルトfunctions.php用:汎用カラー対応コードにある
そして、下記が記事やウィジェットにペーストするショートコードです。
[custom_tag_cloud_boxed_color]ショートコード
これでデフォルトの赤で表示されます。
別の色
デフォルト色を変えたい場合だけ、この ショートコードに 別の赤や別の色(HEXカラーコード)を追加してください。
🔴別の赤の場合
[custom_tag_cloud_boxed_color color="#ef4135"]別の赤のショートコード
ポイント
👉 color="ここ" を変えるだけです。
👉 HEXカラーコード(例:ff0000)なら何でもOKです。
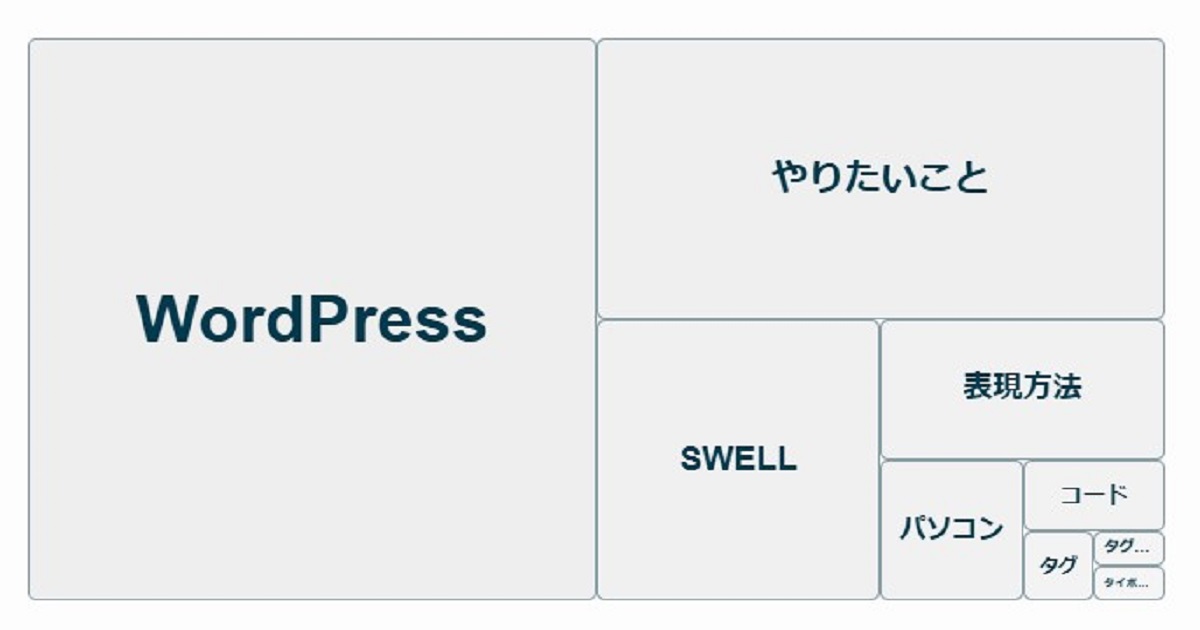
🔵青の場合
[custom_tag_cloud_boxed_color color="#0066ff"]青のショートコード
🟢緑の場合
[custom_tag_cloud_boxed_color color="#2ecc71"]緑のショートコード
表示例
記事やウィジェットにショートコードをペーストしてください。
以下が記事に表示された例です。
記事表示例
総括
本記事では、前回紹介した「ヒートマップ風タグクラウド」をベースに、色を自由に変えて楽しむ方法を解説しました。
PHPとCSSを少し追加するだけで、タグクラウドを単なる一覧表示ではなく、ブログ全体の傾向を視覚的に伝えるパーツとして活用できます。
今回のポイントは、色の指定をCSSやPHPの編集に頼らず、ショートコードの引数だけで完結させた点です。
これにより、記事ごと・ページごとにテーマカラーを変えたり、ブログの雰囲気に合わせて色遊びをしたりと、柔軟な使い分けが可能になりました。
また、既存のSWELL標準タグクラウドや、前回作成したヒートマップ風タグクラウドには影響せず、完全に別枠として追加できる設計になっています。
「まずは動かしてみたい」「失敗したら戻したい」という人でも、安心して試せる構成です。
まとめ
今回紹介した方法の要点は、次の3つです。
- ✅ 色変更はショートコードの
colorだけ - ✅ 記事ごと・ページごとに色を自由に切り替え可能
- ✅ 既存のSWELLタグや前回のヒートマップ表示に影響しない
タグクラウドは「設置して終わり」になりがちですが、
色や見せ方を少し工夫するだけで、ブログの個性や方向性を直感的に伝える装置に変わります。
- 「どんなタグが多いブログなのか」
- 「いま何を書いているブログなのか」
それを一瞬で伝えられるのが、ヒートマップ風タグクラウドの面白さです。
ぜひ、今回の記事を参考に、
自分のブログに合った色・雰囲気を試しながら“遊ぶ感覚”でカスタマイズしてみてください。
思わぬ発見が、ブログづくりのモチベーションにつながるかもしれません。
前回記事
次回記事
コメント