


SWELLテーマで、タグクラウドをデザイン性のある表示にしたいと思いませんか。そこで「タイポグラフィ風」に美しく表示する方法を紹介します。
今回も、CSSとPHPを組み合わせて、文字の字間を自然に詰め、アイキャッチ画像のように仕上げるコードです。
前回の記事に続き、今回の実装手順も以下の3ステップで完結します。
- functions.php にコードを追加
- CSSにスタイルを追加
- ウィジェットに設定して表示
前回記事
タグクラウドの文字間を詰めて美しく表示したい方は、ぜひ試してみてください。
コピペだけで導入でき、ブログのデザインをワンランク上げたい方にもおすすめです。
それでは、さっそく始めていきましょう。
実装
以下のコードを SWELL子テーマの functions.php に追加 してください。
新しいショートコードである「custom_tag_cloud_compact」が使えるようになります。
手順
functions.phpにコードを追加
このコードを追加することで、タグクラウドが自然に「字間を詰めた」美しい配置になります。
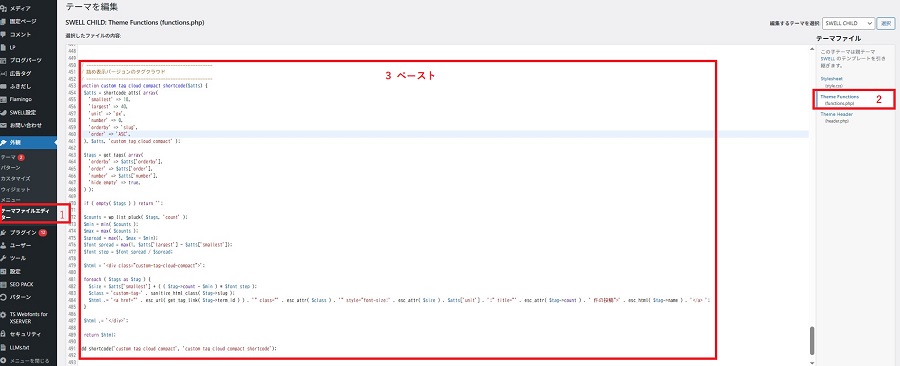
まず、WordPress管理画面から「外観 → テーマファイルエディター」を開き、使用中の 子テーマ(CHILD)の functions.php に以下のコードを追加してください。
1:下記コードをコピーします
// ---------------------------------------------------
// 詰め表示バージョンのタグクラウド
// ---------------------------------------------------
function custom_tag_cloud_compact_shortcode($atts) {
  $atts = shortcode_atts( array(
    'smallest' => 10,
    'largest' => 40,
    'unit' => 'px',
    'number' => 0,
    'orderby' => 'slug',
    'order' => 'ASC',
  ), $atts, 'custom_tag_cloud_compact' );

  $tags = get_tags( array(
    'orderby' => $atts['orderby'],
    'order' => $atts['order'],
    'number' => $atts['number'],
    'hide_empty' => true,
  ) );

  if ( empty( $tags ) ) return '';

  $counts = wp_list_pluck( $tags, 'count' );
  $min = min( $counts );
  $max = max( $counts );
  $spread = max(1, $max - $min);
  $font_spread = max(1, $atts['largest'] - $atts['smallest']);
  $font_step = $font_spread / $spread;

  $html = '<div class="custom-tag-cloud-compact">';

  foreach ( $tags as $tag ) {
    $size = $atts['smallest'] + ( ( $tag->count - $min ) * $font_step );
    $class = 'custom-tag-' . sanitize_html_class( $tag->slug );
    $html .= '<a href="' . esc_url( get_tag_link( $tag->term_id ) ) . '" class="' . esc_attr( $class ) . '" style="font-size:' . esc_attr( $size ) . $atts['unit'] . ';" title="' . esc_attr( $tag->count ) . ' 件の投稿">' . esc_html( $tag->name ) . '</a> ';
  }

  $html .= '</div>';

  return $html;
}
add_shortcode('custom_tag_cloud_compact', 'custom_tag_cloud_compact_shortcode');
phpコード
2:コピーしたコードをペーストします。
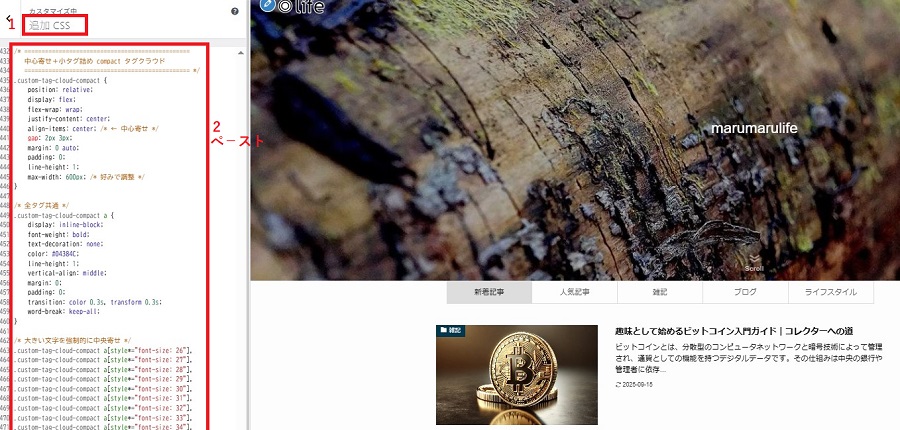
CSSコードの追加
このCSSコードをカスタマイズの追加CSSにペーストすることで、タグクラウドのデザインを調整します。見た目としては、文字の間隔を最適化した「ギュッと詰まったタグクラウド」を実現します。
SWELLテーマのデザインにもなじむ、軽量で美しいレイアウトバージョンです。
1:以下のCSSコードをコピー。
/* ================================================
   中心寄せ+小タグ詰め compact タグクラウド
   ================================================ */
.custom-tag-cloud-compact {
    position: relative;
    display: flex;
    flex-wrap: wrap;
    justify-content: center;
    align-items: center; /* ← 中心寄せ */
    gap: 2px 3px;
    margin: 0 auto;
    padding: 0;
    line-height: 1;
    max-width: 600px; /* 好みで調整 */
}

/* 全タグ共通 */
.custom-tag-cloud-compact a {
    display: inline-block;
    font-weight: bold;
    text-decoration: none;
    color: #04384C;
    line-height: 1;
    vertical-align: middle;
    margin: 0;
    padding: 0;
    transition: color 0.3s, transform 0.3s;
    word-break: keep-all;
}

/* 大きい文字を強制的に中央寄せ */
.custom-tag-cloud-compact a[style*="font-size: 26"],
.custom-tag-cloud-compact a[style*="font-size: 27"],
.custom-tag-cloud-compact a[style*="font-size: 28"],
.custom-tag-cloud-compact a[style*="font-size: 29"],
.custom-tag-cloud-compact a[style*="font-size: 30"],
.custom-tag-cloud-compact a[style*="font-size: 31"],
.custom-tag-cloud-compact a[style*="font-size: 32"],
.custom-tag-cloud-compact a[style*="font-size: 33"],
.custom-tag-cloud-compact a[style*="font-size: 34"],
.custom-tag-cloud-compact a[style*="font-size: 35"],
.custom-tag-cloud-compact a[style*="font-size: 36"],
.custom-tag-cloud-compact a[style*="font-size: 37"],
.custom-tag-cloud-compact a[style*="font-size: 38"],
.custom-tag-cloud-compact a[style*="font-size: 39"],
.custom-tag-cloud-compact a[style*="font-size: 40"] {
    order: 1;               /* Flexで優先的に真ん中寄せ */
    flex-basis: 100%;
    text-align: center;
}

/* 小さい文字は周囲に詰める */
.custom-tag-cloud-compact a[style*="font-size: 10"],
.custom-tag-cloud-compact a[style*="font-size: 11"],
.custom-tag-cloud-compact a[style*="font-size: 12"],
.custom-tag-cloud-compact a[style*="font-size: 13"],
.custom-tag-cloud-compact a[style*="font-size: 14"],
.custom-tag-cloud-compact a[style*="font-size: 15"],
.custom-tag-cloud-compact a[style*="font-size: 16"],
.custom-tag-cloud-compact a[style*="font-size: 17"],
.custom-tag-cloud-compact a[style*="font-size: 18"],
.custom-tag-cloud-compact a[style*="font-size: 19"],
.custom-tag-cloud-compact a[style*="font-size: 20"],
.custom-tag-cloud-compact a[style*="font-size: 21"],
.custom-tag-cloud-compact a[style*="font-size: 22"],
.custom-tag-cloud-compact a[style*="font-size: 23"],
.custom-tag-cloud-compact a[style*="font-size: 24"],
.custom-tag-cloud-compact a[style*="font-size: 25"] {
    flex: 0 1 auto;
    order: 2;
}

/* ホバー */
.custom-tag-cloud-compact a:hover {
    color: #ff6600 !important;
    transform: translateY(-2px);
    text-decoration: underline;
}

/* 色指定例 */
.custom-tag-occupation { color: #EE82EE !important; }
.custom-tag-hobby { color: #FFFF00 !important; }
.custom-tag-expression9 { color: #0000FF !important; }
CSSコード
2:コピーしたコードをカスタマイズの追加CSSに追加します。
3:タグの色指定について
📌この「色指定例」のところで、タグ色を指定してください。
もし前回記事の追加CSSコードがある場合は、前回のタグ色指定を引き継ぎます。
そのため、「前回記事のCSSコードの色指定 + 今回の追加設定 = 現在のタグ色」になります。
前回記事
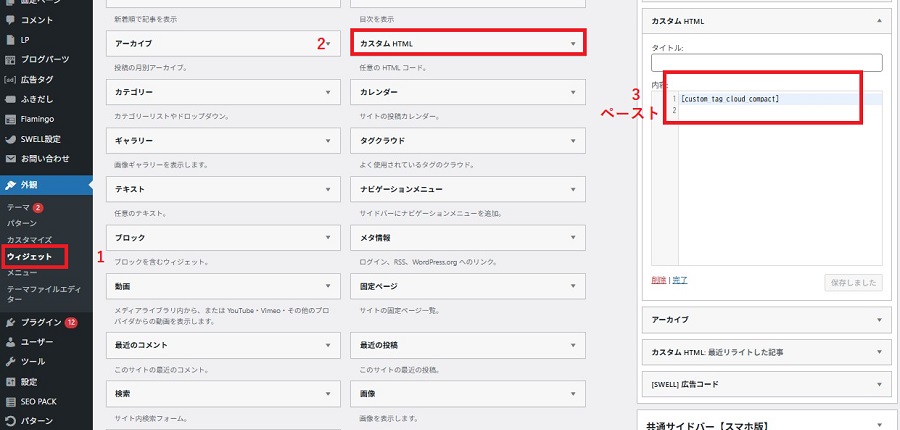
ウィジェットの設定
タグクラウドを表示するために、ウィジェットに 下記のショートコードを追加します。
1:以下のコードをコピー。
[custom_tag_cloud_compact]ショートコード
2:コピーしたコードをウィジェットペーストします。
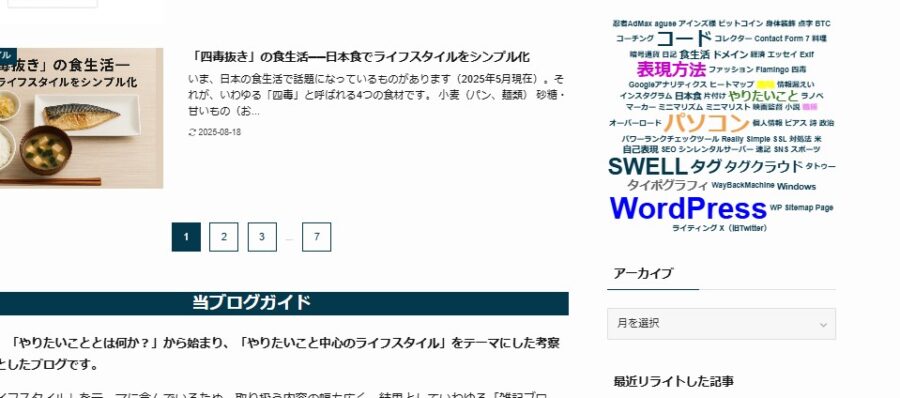
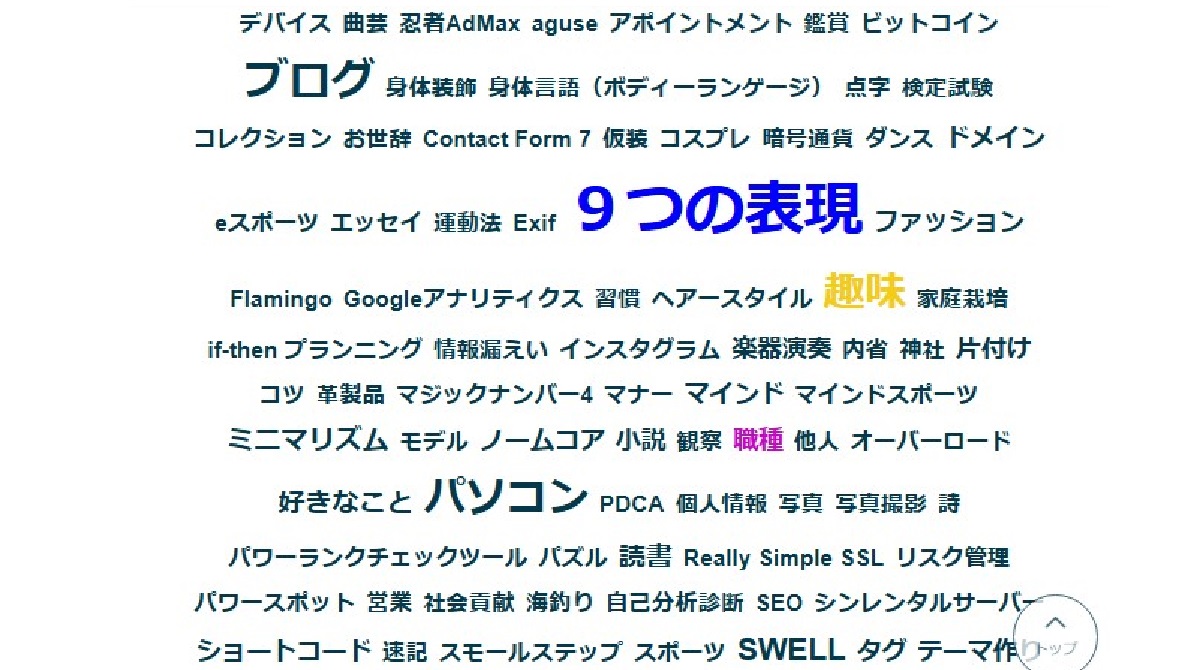
これで、大きいタグと小さいタグが自然に集まったようなデザインになります。完全な「タイポグラフィ」ではありませんが、タイポグラフィ調のデザインとして十分に演出できています。
なお、CSSの調整を加えるとバランスが崩れる可能性があるため、基本的にはこのままコピペして使用することをおすすめします。
サイドバーでの表示
まとめ
今回ご紹介した方法は、前回の SWELL テーマでのタグクラウド表示 を、さらにタイポグラフィ調に進化させたものです。前回のショートコードを改良し、各タグの間隔を最適化することで、より密集感のあるデザインに仕上げました。そのため、タグ数が多いほど美しく映えるレイアウトになっています。
特にサイドバーへの配置がおすすめです。
また、大きいタグを配置することで、ブログがどんなテーマに特化しているかが直感的に伝わるというメリットもあります。
一方で、記事数が少ないうちはタグの数が増えず、デザインがやや寂しく見えるかもしれません。
ぜひ、本記事のコードを使ってタグクラウドのデザインを楽しみながら、記事数を増やすモチベーションにつなげてください。
当記事のコードをコピペするだけで、すぐに実現できます。
ぜひお試しください!
前回の記事
コメント